AC-200 Sound System
The AC-200 was manufactured between September 1968 and March 1975. The following repair sheets are designed to help repair technicians and qualified owners repair and maintaining the AC-200. If at any time you have a question, need a part, or want additional information please contact us -- contact information can be found on this page at the bottom as well as most pages of our web site.
PLEASE NOTE: Some parts for this model are no longer available. We have found some substitute parts but, unfortunately, not all. The AC-200 is no longer serviced at our shop due to their age and lack of replacement parts.
PLEASE NOTE: Some parts for this model are no longer available. We have found some substitute parts but, unfortunately, not all. The AC-200 is no longer serviced at our shop due to their age and lack of replacement parts.
|
|
| ||||||
AC-200 INSTRUCTIONS FOR REMOVING AMPLIFIER FROM CASE
Slide a screwdriver under the chrome handle cover and snap it off, exposing the two screws which hold the handle in place. Remove these screws. On the opposite side of the unit, locate the two rubber feet. Remove the screws that hold these two feet in place.
Before removing the amplifier from the case take off the platter and set it off to the side. Put a piece of masking tape over the brass well that the platter sits down in -- this will keep the ball bearing from falling out. Also, make sure the tone arm is locked in it's clip. Remove the power cord from it’s cage. The entire unit will now slide out of the carrying case.
CHANGING A BRISTOL MOTOR AC-200
Locate the handle cover and slide a screwdriver under the end of the handle cover and pry it off, exposing two bolts which hold the handle on. Remove these two bolts. On the opposite side of the unit, locate the two rubber feet. Remove the bolts which hold the rubber feet on. The entire unit will slide out of the carrying case.
Locate the tension spring which provides the spring tension to hold the motor assembly in contact with the turntable. Remove the nuts and washer from this bolt, remove the spring and the entire motor assembly will swing out so you can get at it.
CAUTION: BEFORE LOOSENING THE MOTOR MOUNTING BOLTS, TAKE A SHARP PENCIL AND MARK THE EXACT LOCATION OF THE MOTOR ON THE MOUNTING PLATE. THE NEW MOTOR MUST BE INSTALLED IN THIS EXACT LOCATION, OR IT WILL NOT HOLD SPEED.
After marking the location of the motor, remove the two motor mounting bolts, unsolder the motor leads and remove the old motor.
Re-install the new motor and adjust the spring tension.
ADJUSTING SPRING TENSION FOR BRISTOL MOTOR
Before adjusting the motor tension, turn on the amplifier and set the speed control to 45. Place your finger on the side of the platter and stop the platter. Listen for the motor to stop. The motor should stop within a second or two. If the motor stops immediately the tension is too tight. If the motor continues to run longer than a second or two the tension is too loose. To adjust the motor tension, remove the platter. Under the platter will be the motor tension screw. Loosen the nut on the screw. To decrease tension lower the screw head (turn the screw clockwise). To increase tension raise the screw head (turn the screw counterclockwise). Place the platter back on the turntable and recheck the tension setting. Should the motor tension screw become too high and hit the platter, remove the amplifier from the case and reduce the height of the screw while increasing the tension from inside the unit.
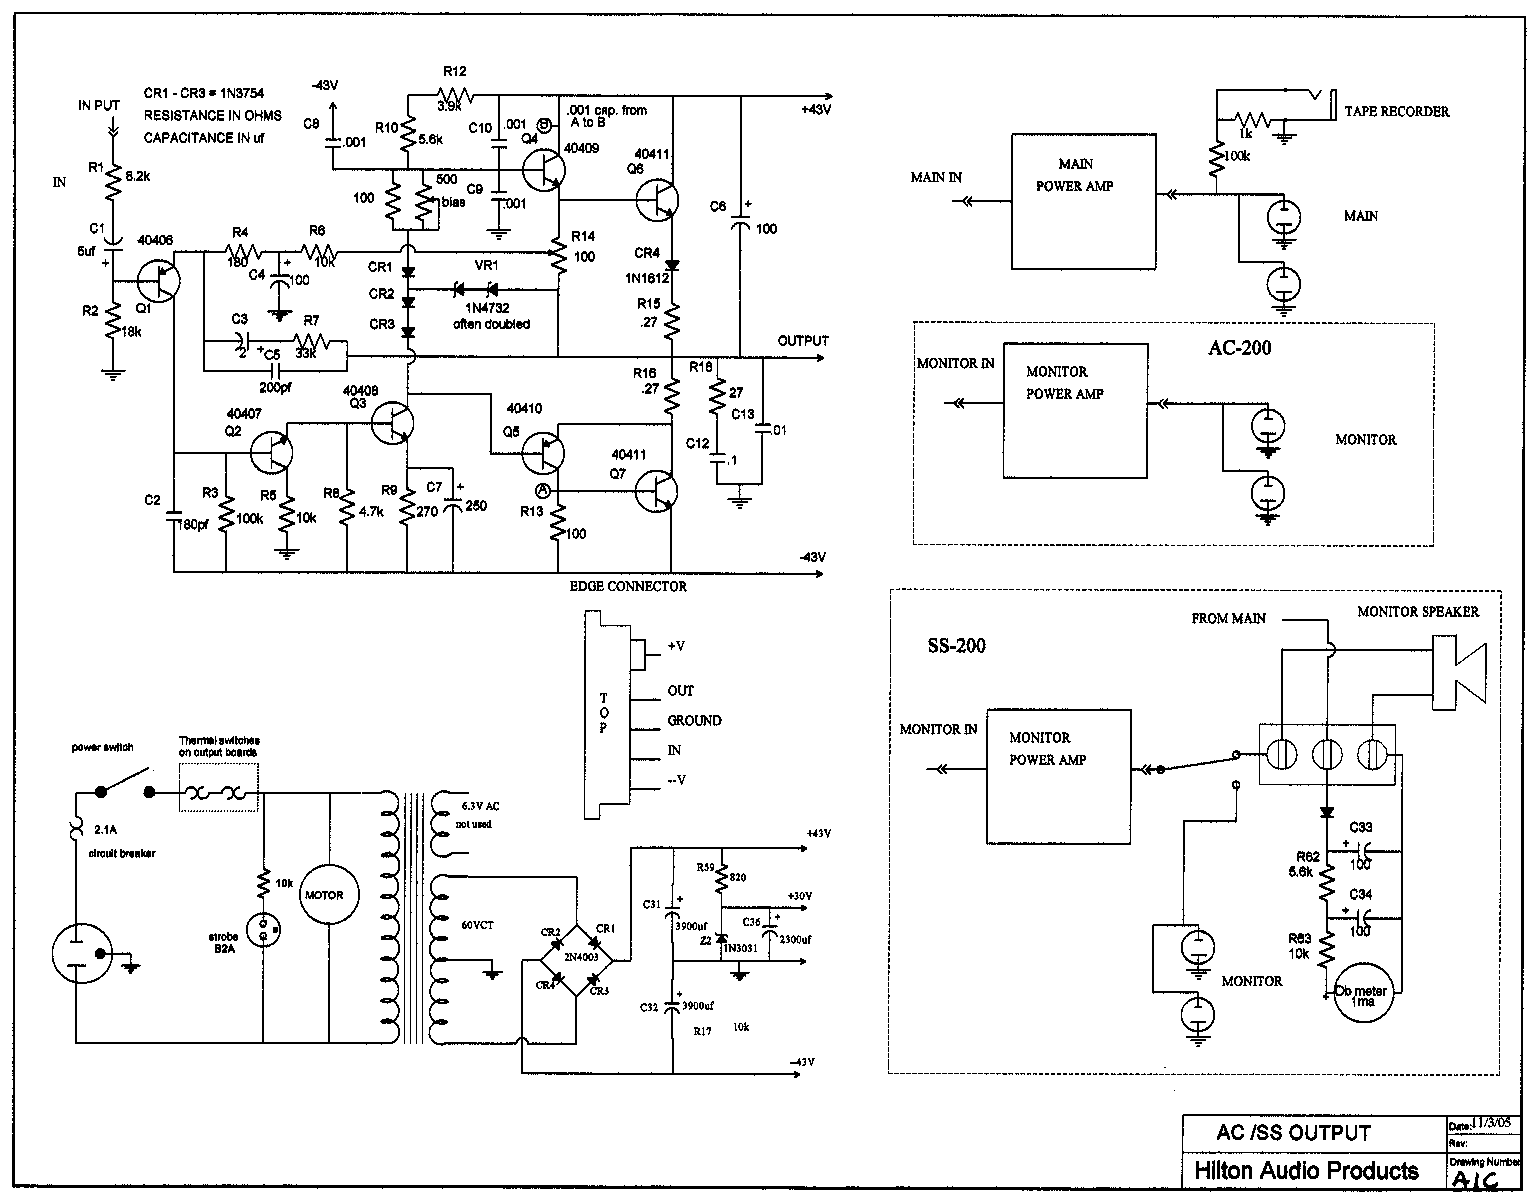
CHANGING OUTPUT BOARD AC-200
Slide a screwdriver under the chrome handle cover and snap it off, exposing the two bolts which hold the handle in place. Remove these bolts. On the opposite side of the unit, locate the two rubber feet. Remove the bolts that hold these feet in place.
Make sure the tone arm is locked in it's clip. Lift out the platter, and set it aside. Be careful, not to lose the little ball bearing on which the spindle turns. Put a piece of tape over the hole so that you don't lose the ball bearing when you later turn the unit upside down. Pull the cord out of the cord holder space, and stand the unit up on the end where the rubber feet were. You can now slip the chassis out of the case.
Turn the unit bottom side up on a soft pad and orient it so that the front panel is nearest you and the speaker jacks are farthest away from you. Remove the aluminum heat plate (about 6 x 11-1/2 inches in size) which is held in place with 6 screws. This will expose the two output boards. The main channel output board will be on your left, nearest the transformer, and the monitor board on your right, nearest the speed control arm.
After determining which channel is malfunctioning, make a careful sketch of the wires leading to the output board. Before unsoldering the wires make sure your sketch shows which colored wire goes to which post. Unsolder these wires and remove the four nuts holding the board in place. Install the new board, resolder the connections, and reverse the above procedure to put the chassis back in the case.
INSTALLING AN EQUALIZER JACK IN THE AC-200
INSTALLING AN EQUALIZER JACK IN YOUR AMPLIFIER COULD REDUCE THE RESALE VALUE OF YOUR UNIT. HILTON AUDIO PRODUCTS WILL NOT ACCEPT FOR TRADE-IN A UNIT THAT HAS BEEN SO MODIFIED.
REMOVING FROM CASE
Slide a large screwdriver under the chrome handle cover and snap it off, exposing the two bolts which hold the handle in place. Remove these bolts. On the opposite side of the unit, locate the two rubber feet. Remove the bolts that hold these feet in place.
Make sure the tone arm is locked in its clip. Lift out the platter, and set it aside. Be careful not to lose the little ball bearing on which the spindle turns. Put a piece of tape over the hole so that you don't lose the ball bearing when you later turn the unit upside down. Pull the cord out of the cord holder space, and stand the unit up on the end where the rubber feet were. You can now slip the chassis out of the case.
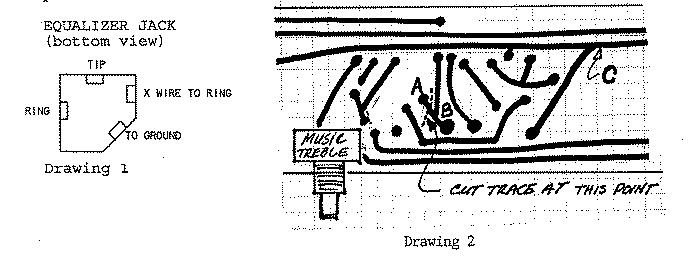
INSTALLING JACKS
An equalizer jack may be installed for the phono side only in the AC-200. The jack should be located so as to keep the wire runs as short as possible, to reduce hum pickup. Between the bass and treble controls is the preferable location. In order to mount the jack it will be necessary to drill a 3/8" jack mounting hole in the front panel.
Place a small jumper wire on the EQ jack from the (X) terminal to the ring terminal. See drawing 1.
To wire the EQ jack: Locate the printed circuit trace and points A and B using drawing 2 below. With a sharp Exacto knife cut the trace between A & B. Run a wire from A to the tip terminal of the EQ jack and a wire from B to the ring terminal of the EQ jack. Run a wire from the EQ jack ground terminal to the ground trace on the p.c. board, point C.
EQUALIZER JACK
(bottom view)
Slide a screwdriver under the chrome handle cover and snap it off, exposing the two screws which hold the handle in place. Remove these screws. On the opposite side of the unit, locate the two rubber feet. Remove the screws that hold these two feet in place.
Before removing the amplifier from the case take off the platter and set it off to the side. Put a piece of masking tape over the brass well that the platter sits down in -- this will keep the ball bearing from falling out. Also, make sure the tone arm is locked in it's clip. Remove the power cord from it’s cage. The entire unit will now slide out of the carrying case.
CHANGING A BRISTOL MOTOR AC-200
Locate the handle cover and slide a screwdriver under the end of the handle cover and pry it off, exposing two bolts which hold the handle on. Remove these two bolts. On the opposite side of the unit, locate the two rubber feet. Remove the bolts which hold the rubber feet on. The entire unit will slide out of the carrying case.
Locate the tension spring which provides the spring tension to hold the motor assembly in contact with the turntable. Remove the nuts and washer from this bolt, remove the spring and the entire motor assembly will swing out so you can get at it.
CAUTION: BEFORE LOOSENING THE MOTOR MOUNTING BOLTS, TAKE A SHARP PENCIL AND MARK THE EXACT LOCATION OF THE MOTOR ON THE MOUNTING PLATE. THE NEW MOTOR MUST BE INSTALLED IN THIS EXACT LOCATION, OR IT WILL NOT HOLD SPEED.
After marking the location of the motor, remove the two motor mounting bolts, unsolder the motor leads and remove the old motor.
Re-install the new motor and adjust the spring tension.
ADJUSTING SPRING TENSION FOR BRISTOL MOTOR
Before adjusting the motor tension, turn on the amplifier and set the speed control to 45. Place your finger on the side of the platter and stop the platter. Listen for the motor to stop. The motor should stop within a second or two. If the motor stops immediately the tension is too tight. If the motor continues to run longer than a second or two the tension is too loose. To adjust the motor tension, remove the platter. Under the platter will be the motor tension screw. Loosen the nut on the screw. To decrease tension lower the screw head (turn the screw clockwise). To increase tension raise the screw head (turn the screw counterclockwise). Place the platter back on the turntable and recheck the tension setting. Should the motor tension screw become too high and hit the platter, remove the amplifier from the case and reduce the height of the screw while increasing the tension from inside the unit.
ADJUSTING SPRING TENSION FOR BRISTOL MOTOR
Before adjusting the motor tension, turn on the amplifier and set the speed control to 45. Place your finger on the side of the platter and stop the platter. Listen for the motor to stop. The motor should stop within a second or two. If the motor stops immediately the tension is too tight. If the motor continues to run longer than a second or two the tension is too loose. To adjust the motor tension, remove the platter. Under the platter will be the motor tension screw. Loosen the nut on the screw. To decrease tension lower the screw head (turn the screw clockwise). To increase tension raise the screw head (turn the screw counterclockwise). Place the platter back on the turntable and recheck the tension setting. Should the motor tension screw become too high and hit the platter, remove the amplifier from the case and reduce the height of the screw while increasing the tension from inside the unit.
CHANGING OUTPUT BOARD AC-200
Slide a screwdriver under the chrome handle cover and snap it off, exposing the two bolts which hold the handle in place. Remove these bolts. On the opposite side of the unit, locate the two rubber feet. Remove the bolts that hold these feet in place.
Make sure the tone arm is locked in it's clip. Lift out the platter, and set it aside. Be careful, not to lose the little ball bearing on which the spindle turns. Put a piece of tape over the hole so that you don't lose the ball bearing when you later turn the unit upside down. Pull the cord out of the cord holder space, and stand the unit up on the end where the rubber feet were. You can now slip the chassis out of the case.
Turn the unit bottom side up on a soft pad and orient it so that the front panel is nearest you and the speaker jacks are farthest away from you. Remove the aluminum heat plate (about 6 x 11-1/2 inches in size) which is held in place with 6 screws. This will expose the two output boards. The main channel output board will be on your left, nearest the transformer, and the monitor board on your right, nearest the speed control arm.
After determining which channel is malfunctioning, make a careful sketch of the wires leading to the output board. Before unsoldering the wires make sure your sketch shows which colored wire goes to which post. Unsolder these wires and remove the four nuts holding the board in place. Install the new board, resolder the connections, and reverse the above procedure to put the chassis back in the case.
INSTALLING AN EQUALIZER JACK IN THE AC-200
INSTALLING AN EQUALIZER JACK IN YOUR AMPLIFIER COULD REDUCE THE RESALE VALUE OF YOUR UNIT. HILTON AUDIO PRODUCTS WILL NOT ACCEPT FOR TRADE-IN A UNIT THAT HAS BEEN SO MODIFIED.
REMOVING FROM CASE
Slide a large screwdriver under the chrome handle cover and snap it off, exposing the two bolts which hold the handle in place. Remove these bolts. On the opposite side of the unit, locate the two rubber feet. Remove the bolts that hold these feet in place.
Make sure the tone arm is locked in its clip. Lift out the platter, and set it aside. Be careful not to lose the little ball bearing on which the spindle turns. Put a piece of tape over the hole so that you don't lose the ball bearing when you later turn the unit upside down. Pull the cord out of the cord holder space, and stand the unit up on the end where the rubber feet were. You can now slip the chassis out of the case.
INSTALLING JACKS
An equalizer jack may be installed for the phono side only in the AC-200. The jack should be located so as to keep the wire runs as short as possible, to reduce hum pickup. Between the bass and treble controls is the preferable location. In order to mount the jack it will be necessary to drill a 3/8" jack mounting hole in the front panel.
Place a small jumper wire on the EQ jack from the (X) terminal to the ring terminal. See drawing 1.
To wire the EQ jack: Locate the printed circuit trace and points A and B using drawing 2 below. With a sharp Exacto knife cut the trace between A & B. Run a wire from A to the tip terminal of the EQ jack and a wire from B to the ring terminal of the EQ jack. Run a wire from the EQ jack ground terminal to the ground trace on the p.c. board, point C.
EQUALIZER JACK
(bottom view)
VOICE & MUSIC
How to record your voice on one track and the music on the other track using an older Hilton AC-300 or AC-200. The instructions also work for the AC-300A, AC-300B, and AC-300C.
These instructions will work with any MiniDisc recorder. They will also work most Computers and CD recorders as long as they have a “Line” level input.
You will need a Hilton “Stereo Recording Isolation” cord. You will need to tell us if you are using a “Walkman” or a larger “Shelf” type MiniDisc Player/Recorder. The small Walkman type systems use a Stereo 3.5mm connection while the Shelf type units have Dual RCA input connections. The Hilton “Stereo Recording Isolation” cord allows you to safely connect your MiniDisc to the ¼” speaker jacks on the back of your Hilton sound system.
You will want to decide right at the start if you want the Music on the Left or the Right channel of your recordings. Whichever way you decide *** Be Consistent *** so your recordings are always the same.
Connect the Hilton “Stereo Recording Isolation” cord with one of the ¼” plugs into a Main Channel speaker jack and the other ¼” plug into a Monitor Channel speaker jack. Connect the other end to the record input of your MiniDisc system. Connect a speaker into the other Main speaker jack so you can hear the music while making the recording. At this point you are properly connected to make a voice on one track, music on the other track recording. It will take a little experimenting the first time to get the level adjusted using the Main Music volume control and the Monitor Voice volume control. You want MUSIC ONLY turned up on the Main Channel of your Hilton and VOICE ONLY turned up on the Monitor Channel. When making your first recordings remember to use the tone controls for your voice and the music for the best recording – this will take a little practice and experimenting! In most cases you will want to decrease the Bass of the music and increase the Treble. Make sure your voice has enough treble to be clear and crisp when played back.
For the best playback on older Hilton systems you will need 2 items. One, a Stereo Signal Booster – this allows you to increase the level coming out of the MiniDisc to match the input of older Hilton systems “Tape Playback” jack. Second, a “playback attenuator” -- this device allows you to connect the voice side of your recording directly into the ¼” Microphone input on any Hilton system. The last of the Hilton AC-300 systems, the AC-300C, does not need the Stereo Signal Booster for playing back your recordings.
It takes a little work and few gadgets to make and playback your Voice and Music recordings but it can be done and work very successfully with older Hilton sound systems. Once you have the recordings and the Signal Booster and Playback Attenuator” you can also play your recordings into smaller single channel Hiltons like the Micro-75A.
CHANGING TONE ARM AC-200
Slide a screwdriver under the chrome handle cover and snap it off, exposing the two screws which hold the handle in place. Remove these screws. On the opposite side of the unit, locate the two rubber feet. Remove the screws that hold these feet in place.
Make sure the tone arm is locked in it's clip. Lift out the platter, and set it aside. Be careful, not to lose the little bearing ball on which the spindle turns. Put a piece of tape over the hole to prevent the ball from coming out when turned upside down. Pull the cord out of the cord holder space, and stand the unit up on the end where the rubber feet were. You can now slip the chassis out of the case.
Turn the unit bottom side up on a soft pad. Locate the point where the wires coming from the tone arm are soldered to the terminal strip. Make a note of the location of each wire. Unsolder these two wires. Remove the nut holding the tone arm pivot, take the old tone arm out and install the new one. Solder the wires to the terminal strip as noted.
Before re-installing the chassis into the case, check to be sure the unit is operating. Turn the unit right-side up, install the turn table platter, connect a speaker, and plug in the power cord. Turn on the amplifier and play a record.
Adjust the antiskate spring. The bottom of the spring is attached to a screw through a collar. To adjust it loosen the screw and rotate the collar in accordance with the following: The starting point or neutral point can be found by placing the needle in the leading groves of a 45 record. With the turntable not turning, loosen the screw and move the collar gently back and forth to find the natural mid point and tighten the set screw. It should not be necessary to vary greatly from this position. To eliminate skipping ahead, increase the tension by rotating the collar counter clockwise about 10 degrees and retest. If repeating is the problem, decrease the spring tension by rotating clockwise.
Reverse the above procedure to put the chassis back in the case.